Using Cloud Object Store
Use this page to learn how to create a Cloud Object Storage bucket on IBM Cloud, use it in ST4SD and accessing it on your laptop.
- Creating a bucket
- Getting the bucket access details
- Using the bucket with st4sd-runtime
- Accessing COS Buckets on your laptop
Cloud Object Store (COS) buckets are places you can store files in the cloud. This guide describes how to create a COS bucket you can use to provide data to, and get data from, workflows running on Kubernetes/OpenShift.
The advantage of this is that you can have the bucket appear as a folder on your local computer, allowing you to easily place input files for workflows in it. Further workflows can be configured to copy their output files to this bucket so they will appear in this folder too - even if they executed in some remote cluster.
Creating a bucket
Login to IBM Cloud
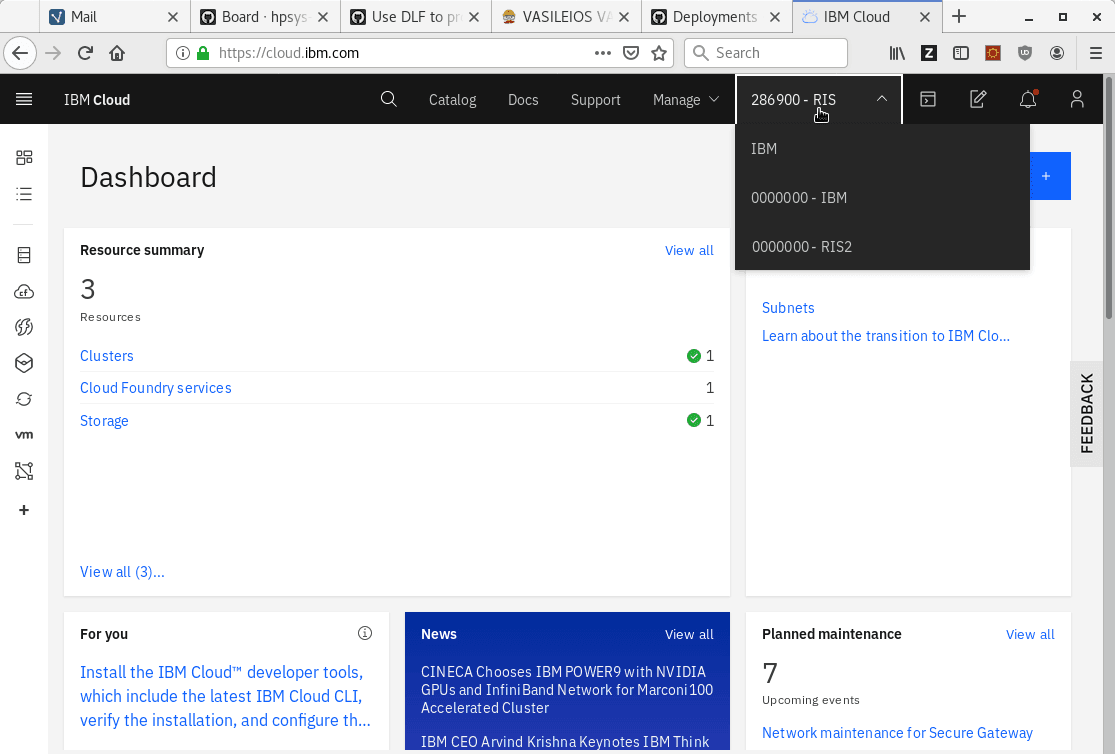
Visit https://cloud.ibm.com/. There’s a drop down menu at the top right corner where you can select your active account. Here we pick the option that reads 289600 - RIS.
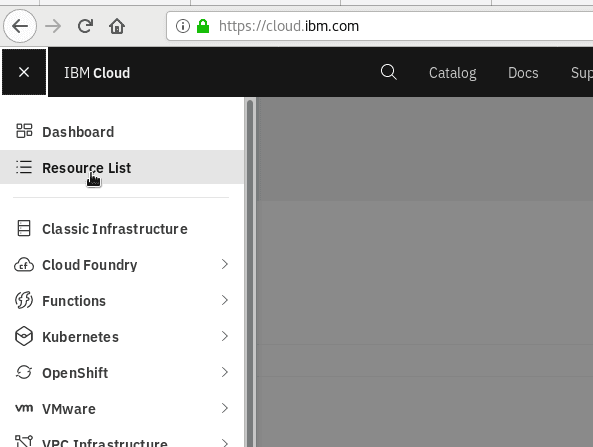
Click on the Resource List in the left hand menu:
Select Storage then click on the Cloud Object Storage service instance you want to host the bucket
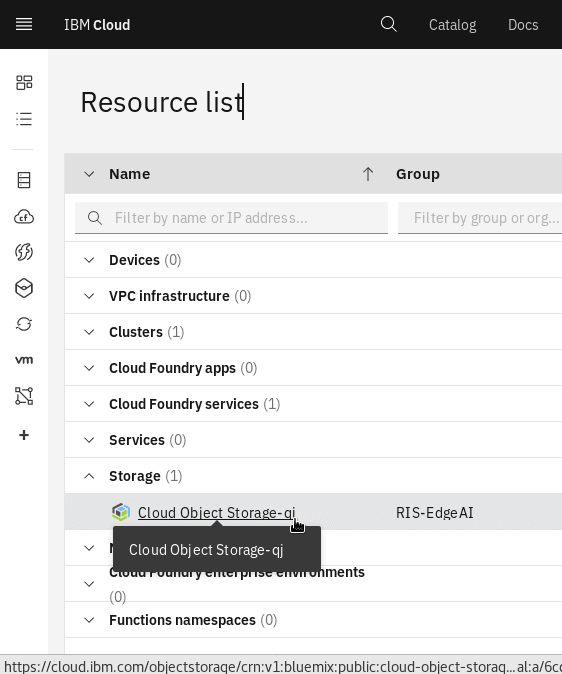
If there is no Cloud Object Storage instance under Storage you will have to create one.
Create a COS bucket
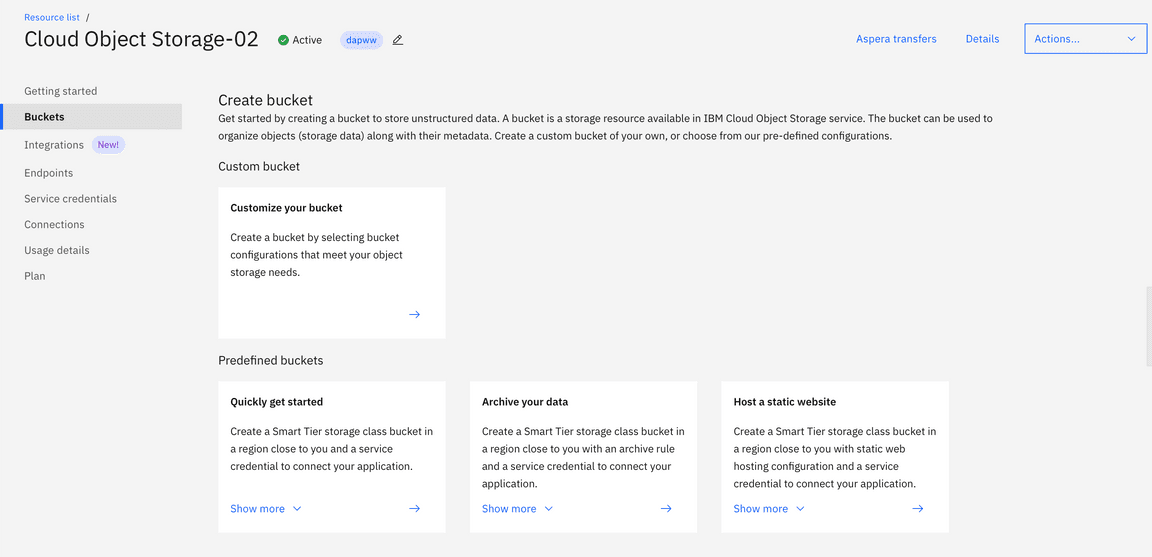
When you click on the cloud storage instance you should see a screen like the following: Click Create bucket
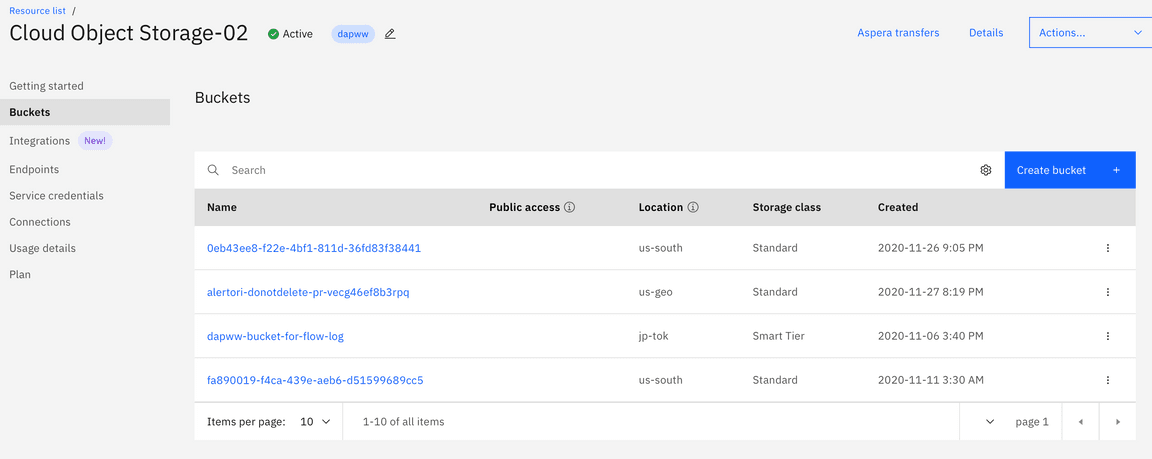
and then Quickly get started(click the arrow in the tile)
On the following screen (see below) enter a name for your bucket. You will use the name this name in the next steps. Also make a note of the bucket region, which is listed in the panel on the right - in this case it is eu-de.

Click the Nextbutton, then you’ll be greeted with a webpage like this:
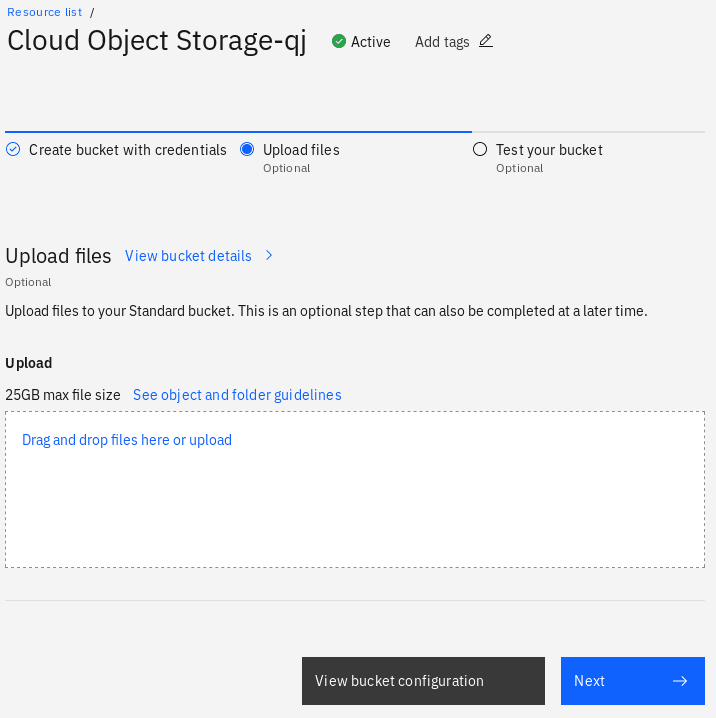
Your bucket is now created and you can add files through this page. The next sections details easier ways to interact with the bucket as a folder on your laptop and also how to use it with the st4sd-runtime.
Getting the bucket access details
The next step is to get the details that allow external programs to access the bucket
Getting the S3 credentials
From the page shown in the last image click on the grey button View bucket configuration and then click on Service credentials on the left-most panel on the webpage. You will be offered a list of Service credentials to pick.
There is normally an entry Service credentials-1. Click on the dropdown button on its left and copy the values for the fields cos_hmac_keys.access_key_id and cos_hmac_keys.secret_access_key.
If you encounter either of the following
- There is no
hmacentry! - There is no
Service credentials-1!
go to the next section, else continue to section Get an endpoint.
Creating a credential
There are a couple of reasons Service credentials-1 is not present, for example
- Someone may have renamed it
- The first person to create a bucket did not use a
smart tier storage class bucketand forgot to toggle theInclude HMAC Credential Option
However, both are is easily corrected by creating a new credential
- Click
New Credential - Give it a name
- Chose
Writerforrole - Click on
Advanced options - Toggle on that
Include HMAC Credentialoption
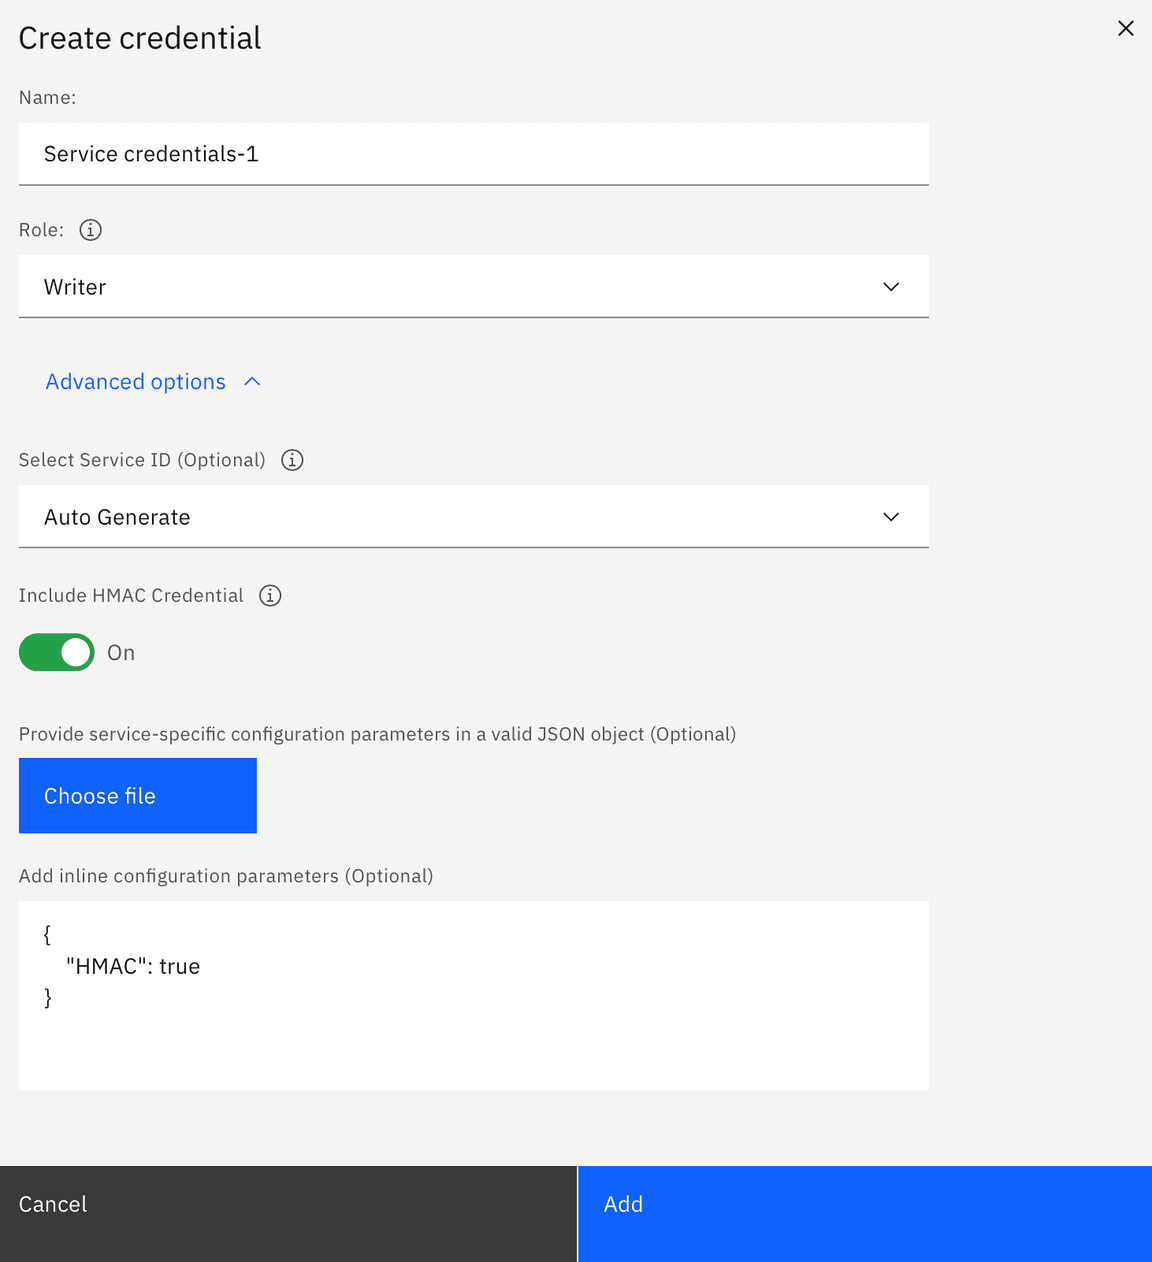
Note that, even though it is best practice to periodically rotate the service credentials you do not need to create new credentials each time you execute a virtual experiment. We suggest that each person generates their own service credentials and periodically rotates them.
Get an endpoint
Note: Do not use the endpoint URL that you see listed in your HMAC Service credentials (section above). Please follow the instructions below to locate your S3 endpoint.
Click on the Buckets link in the left panel, find your bucket (use the search box if you like) and click on it.
Click on Details button in top right

A side panel will appear on the right. Click the View configuration button. This will bring up a page whiich has a section called Endpoints e.g.
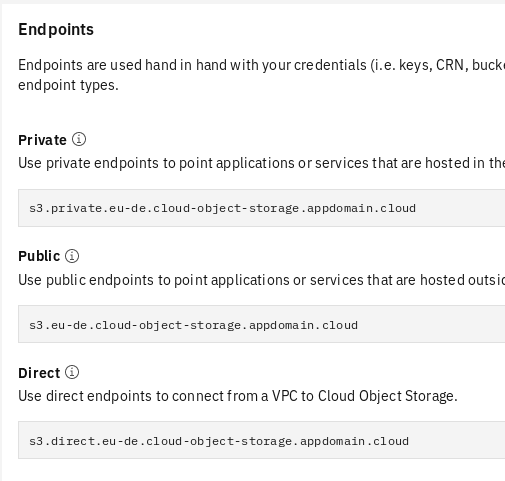
The public endpoint is usually the easiest to go with. However, if you are using a Cloud Object Storage instance that is located in the same IBM Cloud organization we suggest using the private endpoint as it is faster and cheaper.
Using the bucket with st4sd-runtime
There are two ways to use a COS bucket, directly (s3) and via Datashim. You can find more examples that you can use as a starting point for your notebooks in our ST4SD example notebooks.
Datashim simplifies access to buckets allowing one person to create a dataset (a label for the bucket) and others to use it without having to know the access keys or endpoint. It also means the bucket can be moved and users of the bucket don’t have to worry as long as the dataset is updated.
We recommend using Datashim in the long run for managing datasets with workflows. However using Datashim requires it to be installed in the target cluster - check this with the cluster admin.
S3 method
To use the bucket directly when submitting a workflow/virtual experiment from a notebook add the following to the submission configuration (see the ST4SD Runtime API Example notebook for examples of submitting workflows)
"s3": {"accessKeyID": "the contents of `cos_hmac_keys.access_key_id`","secretAccessKey": "the contents of `cos_hmac_keys.secret_access_key`","endpoint": "your endpoint prefixed with https:// (e.g. https://s3.eu-de.cloud-object-storage.appdomain.cloud)","bucket": "the name of your bucket here"},
You can then specify files in the bucket as values to the input and data fields in the experiment configuration. For example, if you add a bucket and specify the following
"data": [{"filename": "get-smiles/input_smiles.csv"}]
Then this file, input_smiles.csv, will be retrieved from the folder get-smiles/ in the bucket.
You may also store key-outputs to S3. For example, sum-numbers has a TotalSum key-output. You could use the payload below to upload that output to an S3 bucket:
"s3Store":{"credentials": {"accessKeyID": "the contents of `cos_hmac_keys.access_key_id`","secretAccessKey": "the contents of `cos_hmac_keys.secret_access_key`","endpoint": "your endpoint prefixed with https:// (e.g. https://s3.eu-de.cloud-object-storage.appdomain.cloud)","bucket": "my-bucket", # the name of your bucket},"bucketPath": "/run1_output/"}
When sum-numbers finishes, it will store the file out.stdout on the bucket my-bucket under the path /run1_output/out.stdout.
Datashim method
The Datashim method is similar to the previous except you provide the s3 access informattion separately to creating a workflow and give it a name. You, and others, can then use this name to access the bucket instead of having to provide the keys etc.
For example if you wanted to create a dataset called my-dataset for a bucket, first create a dictionary containing (assuming you are in a iPython notebook)
payload = {"access_key_id": "the contents of `cos_hmac_keys.access_key_id`","secret_access_key": "the contents of `cos_hmac_keys.secret_access_key`","endpoint": "your endpoint prefixed with https:// (e.g. https://s3.eu-de.cloud-object-storage.appdomain.cloud)","bucket": "my-bucket", # the name of your bucket}# notice that the payload has snake-case fields (these are arguments to a python method)
Then execute
api.api_dataset_create(dataset_name="my-dataset", **payload)
You can list the available datasets using
r = api.api_datasets_list()print(r)
When you submit the experiment you no longer need a full s3 entry like the previous method. Instead, you use the dataset label
"s3": {"dataset": "my-dataset"},
You may also store key-ouputs of your virtual experiment on buckets for which you have created a Dataset. For example:
"s3Store": {"datasetStoreURI": "dataset://my-dataset/run1_output"}
The above snippet stores the workflow outputs into the bucket of Dataset my-dataset using datasetStoreURI. In this case it puts it into a sub-folder called run1_output. Notice that by using s3Store.datasetStoreURI you get the same behavior with specifying s3Store.credentials and s3Store.bucketPath.
Validate that Dataset has been successfully created
For this step you need access to the OpenShift cluster that is hosting the associated ST4SD instance.
To check if the dataset my-dataset was properly created, oc login to the cluster and use oc project to switch to the project that holds the ST4SD instance. Execute:
oc describe dataset my-dataset
The above should print a description of the my-dataset object. Focus on the end of the printout, the part that contains the Status of the object. After the Dataet object has been successfully created it should look similar to:
...Status:Caching:Info: No DLF caching plugins are installedStatus: DisabledProvision:Status: OK
It normally takes about 30 seconds for a Dataset object to finish provisioning. The status will display warning messages if there is something wrong with the configuration of your Dataset. The most common mistake is using the wrong endpoint, bucket, or credentials. The next section discusses addressing such problems.
I used wrong the bucket/credentials/endpoint to create my dataset, what do I do?
For this step you need access to the OpenShift cluster that is hosting the associated ST4SD instance.
First, oc login to the cluster, use oc project to switch to the project that holds the ST4SD instance, and then delete the Dataset object with the invalid configuration. Then you should wait for a few seconds until the PersistentVolumeClaim with the same name as your dataset is garbage collected and then create the dataset again using the correct configuration.
For example, to delete the my-dataset Dataset in the st4sd-production namespace after logging in to OpenShift on your terminal, run
oc project st4sd-productionoc delete dataset my-dataset# wait for the PersistentVolumeClaim (PVC) `my-dataset` to be deleted, run the command below every few seconds# until it returns that there is no such objectoc get pvc my-dataset
At this point you can go back to your python notebook, correct the Dataset payload and execute the code:
api.api_dataset_create(dataset_name="my-dataset", **payload)
Accessing COS Buckets on your laptop
You can mount a COS bucket on your laptop so it appears as any other folder using a variety of tools. This means you can provide workflow input by copying into this folder, and also easily browse workflow output.
Here will demonstrate using s3fs (https://github.com/s3fs-fuse/s3fs-fuse). The general command is:
s3fs $BUCKETNAME -o url=$ENDPOINT $MOUNTPOINT -o passwd_file=$PASSWORDFIILE
Here’s a concrete example for a bucket called cloud-object-storage-drl-cos-standard-ecx-focintegration
s3fs cloud-object-storage-drl-cos-standard-ecx-focintegration -o url=https://s3.eu-de.cloud-object-storage.appdomain.cloud /Users/michaelj/git-working/st4sd-examples/mvp2bucket/ -o passwd_file=${HOME}/.passwd-s3fs
To create the password file do e.g.
echo ACCESS_KEY_ID:SECRET_ACCESS_KEY > ${HOME}/.passwd-s3fschmod 600 ${HOME}/.passwd-s3fs
Where
ACCESS_KEY_ID- the contents ofcos_hmac_keys.access_key_idSECRET_ACCESS_KEY- the contents ofcos_hmac_keys.secret_access_key